Hosted Payments
Get paid easily online or on mobile — secured & hosted by Simplify Commerce.
Overview
With just a few lines of HTML you can use Simplify Commerce's secure hosted payment form for your payments.
Simplify Commerce's hosted payment form will display in as either a modal dialog or an embedded iFrame on your website offering a fluid, simple user experience for your customers.
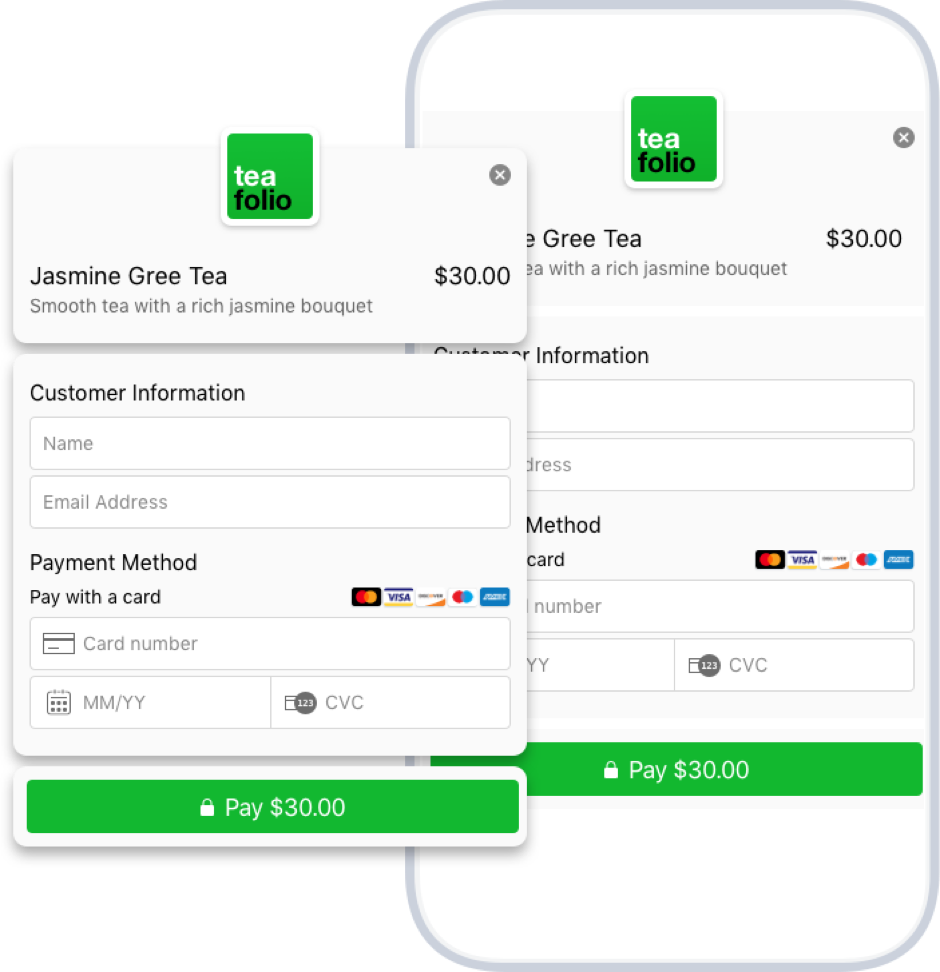
See our hosted payment forms in action by clicking each of the buttons below. Go ahead and fill in the form (it's in test mode).
You can use 5204 7400 0990 0014 for the card number.
The hosted payment can be presented as a modal, or an element embedded in the page.
or
Benefits to using hosted payment:
- Fully brandable logo and colors
- Safe & secure, PCI compliant
- Editable product information
- Smart, user-friendly form validation
- Optimized for screens of all sizes
Check out our sample app on GitHub.
Get Started with Hosted Payments
There are 2 easy ways in which you can start to take hosted payments on your website. You have the option of presenting the hosted payment form as either a modal or embedding it directly on your page.
Depending on your business requirements or personal preference, choose the option that delivers the best experience for your site and your users when taking payments.
Please note:
- The amount fields in relation to currency will be the amount in the smallest denomination of your currency.
- For currencies with 2 decimals please use the amount * 100 (1.00USD = 100)
- For currencies with 3 decimals please use the amount * 1000 (1.000TND = 1000)
- For currencies with 0 decimal places use the amount * 1 (1JPY = 1)
Modal
Follow the simple steps below to add a modal dialog to your site.
- Copy and paste the code snippet below directly into your web page, in the location where you want the button to display.
- Change the value of the
data-sc-keyattribute to your own Hosted Payments Public API Key
<script type="text/javascript"
        src="https://www.simplify.com/commerce/simplify.pay.js"></script>
<button data-sc-key="YOUR_HOSTED_PAYMENTS_ENABLED_PUBLIC_KEY"
        data-name="Jasmine Green Tea"
        data-description="Smooth tea with a rich jasmine bouquet"
        data-reference="99999"
        data-amount="3000"
        data-color="#12B830">
        Buy Now
</button>
Please note:
- You must use a
<button>element. - Security differences affect the modal's behaviour.
- Check out the configuration options available to you.
- Don't forget to use a hosted payment API Key.
Embed
- Copy and paste the code snippet below directly into your web page, in the location where you want the hosted payment form to display.
- Change the value of the
data-sc-keyattribute to your own Hosted Payments Public API Key
<script type="text/javascript"
        src="https://www.simplify.com/commerce/simplify.pay.js"></script>
<iframe name="my-hosted-form"
        data-sc-key="YOUR_HOSTED_PAYMENTS_ENABLED_PUBLIC_KEY"
        data-name="Jasmine Green Tea"
        data-description="Smooth tea with a rich jasmine bouquet"
        data-reference="99999"
        data-amount="3000"
        data-color="#12B830">
</iframe>
Please note:
- Your website must be HTTPS enabled to use this option.
- You must use an
<iframe>element with a name attribute. - Do not set an id attribute on the iframe as it is set on initialization.
- Only 1 embedded hosted payment iframe per page.
- Update the look and feel (see below) of the iframe by adding some CSS.
- Check out the configuration options available to you.
- Don't forget to use a hosted payment API Key.
If you are embedding the hosted payment form, there are some styling considerations to bear in mind. In order to deliver the best seamless experience to your users, we recommend the following CSS:
#simplify-checkout-embed-frame {
    border: none;
    height: 375px; // Value may need adjusting per your requirement
    overflow: hidden;
}
The id simplify-checkout-embed-frame gets set on the iframe, so this CSS will match. The embedded iframe has a transparent background color, so along with the recommended CSS, the hosted payment form should fit naturally to your site.
Accepting Payments or Card Tokenization
There are 2 types of operations permitted when configuring your hosted payments page: create.token and create.payment.
Accepting Payments
This is the default operation when building your button or iframe without explicitly defining an operation type e.g data-operation='create.payment'.
When a user enters their credit card information, a payment is created for the amount specified.
You can configure either a callback or a redirect URL to handle the payment response. Optionally, you can do nothing at all.
Please note:
- You must use a hosted payment enabled API Key for this operation.
Card Tokenization
This configuration option e.g.data-operation='create.token' is used to tokenize the credit card details entered by a user on the hosted payment form. This operation provides you with greater control over the payment experience. However, you need to download one of
Simplify Commerce's SDKs and complete the payment on the server.
A JavaScript callback function needs to be specified to handle the token value. This token can then be used with our API to charge the card.
Please note:
- You need to download an SDK and complete the payment on the server.
- Your website must be HTTPS enabled in order to use this option.
- You can use any API Key for this operation.
Configuration
Your hosted payment button or iframe can be configured using HTML data attributes. If you have multiple buttons, you can set global options using our JavaScript API. Options set using the data attributes on the button or iframe take precedence over the JavaScript options.
Data Attributes
The HTML data attributes must be prefixed with data, e.g. data-sc-key
<button data-sc-key="YOUR_HOSTED_PAYMENTS_ENABLED_PUBLIC_KEY"
        data-amount="3000">
        Buy Now
</button>
JavaScript
A global variable called SimplifyCommerce is exposed from which you can configure your hosted payments.
The available functions include:
hostedPayments(callback, options)
callback
A function to handle the payment or card tokenization response.
options
A JSON object with the configuration options.
An object which exposes functions to control the behaviour of the hosted payments form.
closeOnCompletion()
A function that can be chained to close a modal hosted payment form automatically.
enablePayBtn()
A function to re-enable the payment button. This is useful when the operation is
create.token as the payment button is left disabled after the user clicks the pay button.
Options set using the JavaScript API apply to all the buttons on your page. JavaScript options must be camel case, e.g., scKey.
<script>
    SimplifyCommerce.hostedPayments(
        function(response) {
            // response handler
        },
        {
            scKey: "YOUR_HOSTED_PAYMENTS_ENABLED_PUBLIC_KEY",
            color: "#12B830"
        }
    );
</script>

<button data-amount="3000">Buy Now $30</button>
<button data-amount="5000">Buy Now $50</button>
Options
For currencies with 2 decimals please use the amount * 100 (1.00USD = 100)
For currencies with 3 decimals please use the amount * 1000 (1.000TND = 1000)
For currencies with 0 decimal places use the amount * 1 (1JPY = 1)
create.payment creates a payment. This is the default option.
create.token will return a card token in the response. It will not result in a payment. The card token can be used with our API to create a payment or save the card to a customer.
Handling Responses
The response from the payment request can be handled in two ways: using a JavaScript callback or a browser redirect with query parameters.
JavaScript Callback
The JavaScript callback can only be used on websites that use HTTPS.
<script>
    SimplifyCommerce.hostedPayments(
        function(response) {
            console.log(response);
            // add your custom handler code here
        }
    ).closeOnCompletion();
</script>
<script>
    /**
     * Configure hosted payments callback.
     */
    var hostedPayments = SimplifyCommerce.hostedPayments(
        function(response) {
            var cardToken = response.cardToken;
            console.log(cardToken);

            // TODO: Pass token to the server & use Simplify's API to make a payment
        },
        {
            operation: 'create.token'
        }
    );

    /**
     * Handle the error response from the server call that
     * failed to make a payment from the card token.
     */
    function apiPaymentErrorHandler() {
        // re-enable the payment button, so the user can try again.
        hostedPayments.enablePayBtn();

        // TODO: Handle error
    }
</script>
A JSON object with the response parameters will be returned to the callback function.
Create Payment Response
For more detail on the response parameters see the payment API documentation.
Success response:
{
    "data":{
        "paymentDate":1420648846866,
        "authCode":"wKQuyx",
        "feeEstimated":false,
        "feeCurrency":"USD",
        "settlementAmount":3000,
        "paymentStatus":"APPROVED",
        "settlementCurrency":"USD",
        "reference":"99999",
        "amountRemaining":3000,
        "currency":"USD",
        "fee":116,
        "id":"oTGokc",
        "amount":3000,
        "amountEstimated":false,
        "refundedFees":0,
        "refunded":false,
        "source":"HOSTED_PAYMENTS",
        "description":"Jasmine Green Tea",
        "dateCreated":1420648846875,
        "disputed":false,
        "card":{
            "id":"MTqzLc",
            "expMonth":10,
            "expYear":99,
            "name":"Jane Doe",
            "dateCreated":1420648846516,
            "last4":"4444",
            "type":"MASTERCARD"
        },
    },
    "signature":"83962C160484C3A6D2CE5CBC4EBC80C0"
}
Error response:
{
   "field":"amount",
   "code":"nullable",
   "message":"amount cannot be null"
}
Create Token Response
For more detail on the response parameters see the card token API documentation.
{
    "card":{
         "id":"4TkGMc",
         "expMonth":10,
         "expYear":99,
         "dateCreated":1415276012360,
         "last4":"4444",
         "type":"MASTERCARD",
         "name":"Jane Doe"
    },
    "cardToken":"7d53dde5-ddc0-488a-ae33-5e43f1a",
    "amount":"3000",
    "reference":"REF123"
}
Modal Redirect URL
Use the redirect URL to return your customers back to your website with the response parameters returned in the query string. This option is ideal for websites that do not use HTTPS.
<script type="text/javascript" src="https://www.simplify.com/commerce/simplify.pay.js"></script>
<button data-sc-key="YOUR_HOSTED_PAYMENTS_ENABLED_PUBLIC_KEY"
        data-name="Jasmine Green Tea"
        data-description="Smooth tea with a rich jasmine bouquet"
        data-reference="99999"
        data-amount="3000"
        data-color="#12B830"
        data-redirect-url="https://www.example.com/checkout.html">
        Buy Now
</button>
Create Payment Response
For more detail on the response parameters see the payment API documentation.
https://www.example.com/checkout.html?amount=5000&paymentId=ddg4M6bG&paymentDate=1420552883439&paymentStatus=APPROVED&authCode=5e6LRN¤cy=USD&signature=CE7851CA4C6F4FB23F07F4A155324229&reference=REF123
Create Token Response
For more detail on the response parameters see the card token API documentation.
https://www.example.com/checkout.html?cardToken=7d53dde5-ddc0-488a-ae33-5e43f1a&amount=3000&reference=REF123&name=Jane%20Doe
Testing
You can test hosted payments locally or on your site by using a sandbox key when setting the data-sc-key attribute on your button/iframe or via JavaScript.
When completing the form you can use our test card numbers.
When you are happy with your testing and ready to accept live payments, you need to update your public key value to use your live public key.
API Key Types:
- Sandbox Key: These are test keys and follow the pattern of
sbpb_e.g. sbpb_123456789. - Live Key: These are keys and enable real payments and follow the pattern of
lvpb_e.g. lvpb_123456789.
Security
HTTP vs HTTPS
There are some security considerations to bear in mind when choosing which option of hosted payments to choose. Either option may be chosen and work as expected when using a sandbox key or in test mode.
However, when you switch to using a
live key and begin to use hosted payments for real on your website, each have different requirements:
If your website is accessible over HTTPS, clicking the Simplify hosted payment button will display the payment form in a modal dialog on your website, offering a fluid, simple user experience for your customers. We recommend HTTPS as the best way to use Simplify Commerce's hosted payment button.
If your website is only accessible over HTTP, clicking the Simplify hosted payments button will redirect to a secure (HTTPS) page on Simplify.com. You can specify a redirect URL to return your customers back to your website once the transaction is complete.
Your website must be accessible over HTTPS only. The iframe will not load if your website is only accessible over HTTP. Your only option is to use the Modal option.
Domain Restrictions
When used for live payments (e.g. when configured with a live API key), the hosted payment button will only work on the website you registered when onboarding to a live Simplify Commerce account. This restriction is disabled when using a sandbox key for testing.
API Keys
If you specify create.payment or omit an operation type, you must create a new API Key pair with the 'Enable hosted payments' option selected (see screenshot below).
Use the public key from this new key pair when configuring your hosted payment button.
After logging into your account, your API keys can be located at: Settings -> API Keys

Response Validation
The response will contain a hash signature that can be used to validate the response. The hash is made up of the query string parameters or the data object in the JSON response, plus your private API key.
You can recreate the signature on your server to validate that the response parameters were not tampered with.
The signature is created as follows: UPPERCASE(MD5_ENCODE("amount + reference + paymentId + paymentDate + paymentStatus + privateKey”))
Below is an example in PHP
<?php
$amount = '5000'; // The amount you supplied for this payment
$reference = 'order 123'; // The reference you supplied for this payment
$paymentId = $_REQUEST['paymentId']; // The simplify payment id
$paymentDate = $_REQUEST['paymentDate']; // The simplify payment date
$paymentStatus = $_REQUEST['paymentStatus']; // The simplify payment status
$privateKey = 'YOUR_PRIVATE_KEY'; // Your hosted payments enabled private API key

$signature = $_REQUEST['signature'];

$recreatedSignature = strtoupper(md5($amount . $reference . $paymentId . $paymentDate . $paymentStatus . $privateKey));

if ($recreatedSignature != $signature) {
    $result = 'Fail - signatures so not match';
} else {
    $result = 'Success - signatures matched';
}

echo $result;
?>
Remember to keep your private key safe and only recreate the signature on your server.
Browser Support
Hosted payments will work in all modern browsers including Internet Explorer 8+. However, in order to work in IE8+ it must be configured to run in standards mode. To enable standards mode you must include a <!DOCTYPE> in the HTML page that is hosting the payment button.
Troubleshooting
If hosted payments doesn't work straight away, below is a checklist that may help you get up and running.
- Use a Hosted Payment Enabled API Key: If you plan on using the form to make payments, then you need to use the right key. See our section above on how to enable an API key for hosted payments.
- Use the Public Key: So you enabled an API Key Pair for hosted payments, but it still doesn't work. There are 2 keys, so make sure it is the public key that is used. Public keys start with sbpb_ (sandbox/test key) or lvpb_ (live key).
- Use the Correct Website: You have successfully tested your hosted payments locally and now have switched to a live key. As a security measure, hosted payments will only work on the website you registered with Simplify.com when you onboarded. See Domain Restrictions.
Got any questions?
If you have any trouble with Simplify Commerce's hosted payment solution, don't hesitate to contact us at: no-reply@simplify.com

